Friday, June 30, 2023

Azure Quickstart Templates: A Great Resource for Learning ARM Templates


Azure Quickstart Templates: A Great Resource for Learning ARM Templates


Azure Quickstart Templates are a great resource for learning ARM templates. They are provided by the Azure community and cover a wide range of scenarios.

What are Quickstart templates?

Quickstart templates are Azure Resource Manager templates that are provided by the Azure community. They are designed to help you get started with Azure quickly and easily.


What do Quickstart templates include?


Quickstart templates typically include the following files:

README.md: This file provides an overview of what the template does.
azuredeploy.json: This file defines the resources that will be deployed.
azuredeploy.parameters.json: This file provides the values the template needs.

How to use Quickstart templates


To use a Quickstart template, you can follow these steps:Download the template from the Azure Quickstart Templates repository.
Open the template in a text editor.
Review the README.md file to learn more about the template.
If necessary, modify the azuredeploy.parameters.json file to provide the values the template needs.
Deploy the template using the Azure CLI or PowerShell.

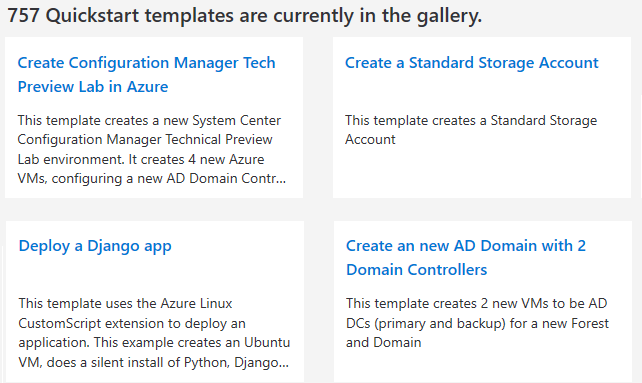
Where to find Quickstart templates

You can find Quickstart templates in the Azure Quickstart Templates repository. The repository is organized by language and technology.

Why use Quickstart templates?

There are several reasons why you might want to use Quickstart templates:They are a great way to learn ARM templates. The README.md files in Quickstart templates provide a good overview of how the templates work.
They can save you time. Quickstart templates can help you get started with Azure quickly and easily.
They are well-tested. Quickstart templates are tested by the Azure community before they are published.

If you are new to ARM templates, I encourage you to check out the Azure Quickstart Templates repository. There are a number of great templates that can help you get started with Azure quickly and easily.

Azure Bicep


Azure Bicep: 

A More Concise and Declarative Way to Deploy Azure Resources

Azure Bicep is a domain-specific language (DSL) that uses declarative syntax to deploy Azure resources. It provides a simpler syntax, reliable type safety, and support for code reuse.


Why use Bicep?

There are several reasons why you might want to use Bicep instead of JSON to develop your Azure Resource Manager templates (ARM templates):

Simpler syntax: 

Bicep's syntax is designed to be easy to read and write. It uses a combination of keywords, expressions, and string interpolation to make it easier to express the desired state of your Azure resources.

Type safety: 

Bicep templates are type-safe, which means that the compiler can check for errors at compile time. This helps to prevent errors in your deployments and makes it easier to debug your templates.

Code reuse: 

Bicep templates can be broken down into smaller modules, which can be reused in other templates. This makes it easier to maintain and evolve your templates over time.

Automatic dependency management:

Bicep automatically detects dependencies between your resources. This means that you don't have to worry about specifying the order in which resources are deployed.

How does Bicep work?

When you deploy a resource or series of resources to Azure, the tooling that's built into Bicep converts your Bicep template into a JSON template. This process is known as transpilation. Transpilation is the process of converting source code written in one language into another language.

Here are some additional tips for using Bicep:Use the Bicep extension for Visual Studio Code. This extension provides syntax highlighting, IntelliSense, and other features that make it easier to develop Bicep templates.

Check out the Bicep documentation. The Bicep documentation provides a comprehensive overview of the language, including its syntax, features, and usage.

Join the Bicep community. There are a number of online communities where you can ask questions, get help, and share tips about Bicep.

If you're looking for a more concise and declarative way to deploy Azure resources, then you should consider using Bicep. Bicep is a powerful tool that can help you to improve the efficiency and maintainability of your deployments.

Azure Resource Manager Templates: The Benefits of Using Code to Deploy Infrastructure


Azure Resource Manager Templates: The Benefits of Using Code to Deploy Infrastructure


Azure Resource Manager (ARM) templates are a powerful tool that can help you to deploy your infrastructure more quickly, consistently, and reliably. ARM templates are written in JSON, and they define the resources that you want to deploy, as well as the relationships between those resources.

Here are some of the benefits of using ARM templates:

Consistency: ARM templates provide a common language for you and others to describe your deployments. This makes it easier to share and reuse templates, and it also helps to ensure that your deployments are consistent.

Reliability: ARM templates can help to prevent errors in your deployments. For example, ARM templates can ensure that resources are deployed in the correct order, and they can also validate the values that you specify for your resources.

Scalability:
ARM templates are scalable, so you can use them to deploy large and complex infrastructures.

Repeatability:
ARM templates make it easy to deploy your infrastructure repeatedly. This can be helpful for testing, staging, and production environments.

Code: ARM templates are code, so they can be versioned, shared, and managed just like any other piece of software. This makes it easy to track changes to your deployments, and it also makes it easier to collaborate with others.

If you're looking for a way to deploy your infrastructure more quickly, consistently, and reliably, then you should consider using ARM templates.

Here are some additional tips for using ARM templates:

Use parameters to make your templates more reusable.

Parameters allow you to define values that can be changed when the template is deployed. This can be helpful for things like specifying the name of a resource or the size of a disk.

Use linked templates to create modular deployments. Linked templates allow you to combine multiple templates into a single deployment. This can be helpful for breaking down a large deployment into smaller, more manageable pieces.

Use the Azure CLI or PowerShell to deploy your templates. The Azure CLI and PowerShell provide command-line tools that can be used to deploy ARM templates. This can be helpful for automating your deployments and for scripting complex deployments.

I hope this blog post has convinced you of the benefits of using ARM templates. 

If you're interested in learning more, 

I recommend checking out the Azure Resource Manager documentation:

https://docs.microsoft.com/en-us/azure/azure-resource-manager/.

How to Determine Your Azure Resource Limits


How to Determine Your Azure Resource Limits

Azure imposes limits on the number of resources that you can create in a subscription. These limits are designed to protect Azure from abuse and to ensure that all users have a fair share of resources.

How to view your resource limits

To view your resource limits, you can use the Azure portal, the Azure CLI, or the Azure PowerShell.

Here are the steps on how to view your resource limits using the Azure portal:

  1. Go to the Azure portal.
  2. Click the Subscriptions blade.
  3. Select the subscription that you want to view the limits for.
  4. Click the Resource limits tab.


Here are the steps on how to view your resource limits using the Azure CLI:

  1. Install the Azure CLI.
  2. Open a command prompt.
  3. Run the following command:
Code snippet
az account show --subscription <subscription-name>

This will show you the limits for your subscription.

Here are the steps on how to view your resource limits using the Azure PowerShell:

  1. Install the Azure PowerShell module.
  2. Open a PowerShell console.
  3. Run the following command:
Code snippet
Get-AzSubscription -SubscriptionName <subscription-name>

This will show you the limits for your subscription.

How to increase your resource limits

If you need to increase your resource limits, you can submit a request to Azure. To do this, you will need to provide a justification for the increase.

Here are the steps on how to increase your resource limits:

  1. Go to the Azure portal.
  2. Click the Subscriptions blade.
  3. Select the subscription that you want to increase the limits for.
  4. Click the Resource limits tab.
  5. Click the Request increase button.
  6. Provide a justification for the increase.
  7. Click the Submit button.

Conclusion

Determining your Azure resource limits is an important step in managing your Azure environment. By understanding your limits, you can avoid exceeding them and incurring charges. You can also use your limits to plan for future growth.

How to Delete Azure Resources and Resource Groups


How to Delete Azure Resources and Resource Groups

As your Azure environment grows, you may find that you need to delete resources that you no longer need. You can also delete resource groups, which will delete all of the resources contained within them.

Deleting resource groups

Deleting a resource group is a permanent operation. It will delete all of the resources contained within the resource group, including virtual machines, storage accounts, and databases.

To delete a resource group, you can use the Azure portal, the Azure CLI, or the Azure PowerShell.

Here are the steps on how to delete a resource group using the Azure portal:

  1. Go to the Azure portal.
  2. Click the Resource groups blade.
  3. Select the resource group that you want to delete.
  4. Click the Delete button.
  5. Confirm that you want to delete the resource group.


Here are the steps on how to delete a resource group using the Azure CLI:

  1. Install the Azure CLI.
  2. Open a command prompt.
  3. Run the following command:
Code snippet
az group delete --name myResourceGroup

Here are the steps on how to delete a resource group using the Azure PowerShell:

  1. Install the Azure PowerShell module.
  2. Open a PowerShell console.
  3. Run the following command:
Code snippet
Remove-AzResourceGroup -Name myResourceGroup

Deleting resources

You can also delete individual resources within a resource group. To do this, you need to know the resource type and the resource name.


For example, to delete a virtual machine, you would run the following command:

Code snippet
az vm delete --name myVM --resource-group myResourceGroup

Here are some things to keep in mind when deleting resources:

  • You cannot delete a resource that is in use.
  • You cannot delete a resource that is dependent on another resource.
  • Deleting a resource may have unintended consequences. For example, deleting a virtual machine may also delete the data stored on the virtual machine.

Conclusion

Deleting resources and resource groups can be a helpful way to manage your Azure environment. By following the steps in this blog post, you can easily delete resources and resource groups using the Azure portal, the Azure CLI, or the Azure PowerShell.

Azure PowerShell Basic Commands: A Quick Guide

    Azure PowerShell Basic Commands: A Quick Guide PowerShell is a powerful command-line tool that can be used to automate tasks on Windows ...